... header area ...

<div id="content">
     <div class="container">
          <div class="row">
               <div class="col-md-4">
                    this is your content
               </div>
               <div class="col-md-8">
                    this is your content
               </div>
          </div>
     </div>

     <section>
          <div class="container">
               <div class="row">
                    this is your content
               </div>
          </div>
     </section>

</div>


... footer area ...
Archi
Thank you for purchasing our theme. If you have any questions that are beyond the scope of this help file, please feel free to ask via item's comments. Also please don't forget to give item ratings! Thanks so much! :)
HTML Structure
Sample Structure For Content
This template using Bootstrap framework. Main content is placed between header and footer area. The content is nested within <div id="content">.
Create Columns
For a simple two column layout, create a .row and add the appropriate number of .col-md-* columns. As this is a 12-column grid, each .col-md-* spans a number of those 12 columns, and should always add up to 12 for each row (or the number of columns in the parent).
Please read more for Bootstrap grid system here: https://getbootstrap.com/docs/4.5/layout/grid/
<div class="row">
     <div class="col-md-6"> this is 1/2 columns </div>
     <div class="col-md-6"> this is 1/2 columns </div>
</div>

<div class="row">
     <div class="col-md-4"> this is 1/3 columns </div>
     <div class="col-md-8"> this is 2/3 columns </div>
</div>

<div class="row">
     <div class="col-md-3"> this is 1/4 columns </div>
     <div class="col-md-9"> this is 3/4 columns </div>
</div>
RTL Support
This template is support for RTL. To enable RTL you can insert class name 'rtl' to body class on each page.
<body class="rtl">
Styling Your Template
Accent color
For each template page, look at line 34 below
<link rel="stylesheet" href="css/colors/yellow.css" type="text/css" id="colors">
Then replace yellow.css with another value. You can choose one of below: aqua.css, blue.css, green.css, grey.css, lime.css, orange.css, pink.css, purple.css, red.css, white.css, yellow.css. All premade color on this template can be found inside folder css/colors/.
Scheme color
To set all pages scheme color to dark or light
Open file js/designesia.js then change de_color_style value.
1 - default, 2 - light style
Font style
Open file js/designesia.js then change de_font_style value.
Header style
To set header background solid or transparent.
Open file js/designesia.js then change de_header_style value.
Header layout
To set visibilty content above header.
Open file js/designesia.js then change de_header_layout value.
Header sticky
To keep header visible on page scroll.
Open file js/designesia.js then change value for de_header_sticky (for desktop) and de_header_mobile_sticky (for mobile).
Header color
To set header background color dark or light
Open file js/designesia.js then change de_header_color value.
// 1 - default, 2 - light style
Menu separator
To set mainmenu separator icon
Open file js/designesia.js then change de_menu_separator value.
1 - dotted, 2 - border, 3 - circle, 4 - square, 5 - plus, 6 - strip, 0 - none
Menu burger (menu mobile) for all screen size
To use menu burger for all pages:
Open file js/designesia.js then change value for de_force_mobile_menu to 1
var de_force_mobile_menu = 1
To use menu burger for one page only:
Open any page that you want to have menu burger then add class name 'force-header-mobile' inside header tag
<header class="force-header-mobile">
Background css settings for section and subheader
All section/subheader background on this template can be edited within file css/bg.css
Background color for div/section
To make custom background color without touching css file, you can use code data-bgcolor="#hex-color" within your div/section tag. See sample below:
<div data-bgcolor="#333333">
     my div content...
</div>
Background image for div/section
To make custom background image without touching css file, you can use code data-bgimage="url(your-image-url)" within your div/section tag. See sample below:
<div data-bgimage="url(images/background/bg-1.jpg)">
     my div content...
</div>
Backrgound parallax
- Create a section tags then give it an id name.
<section id="my-section">...content here...</section>
- Add data-speed attribute (1-10).
<section id="my-section" data-speed="10">...content here...</section>
- Add data-type attribute below.
<section id="my-section" data-speed="10" data-type="background">...content here...</section>
- Open bg.css file, set background image for your section.
#my-section{ background-image:my-bg-image.jpg; } - Done.
Animate object on scroll
Select an object that you want to animate. As example you want create animate for H1 element. You can see below:
<h1 class="wow fadeIn" data-wow-delay=".2s">Animate Text</h1>
- You must add class name "wow" for object that you want to animate.
- fadeIn: sample type of animation. You can see all animation available from: http://daneden.github.io/animate.css/
- data-wow-delay: determine when animation will start (on second)
Google map api location
You can change location for Google map by open file js/map.js. Look code at line 7. Then change
value for variable ‘myLatlng’.
You can generate latitude and longitude value here: http://www.latlong.net/
Countdown date
You can change countdown date by open file js/countdown-custom.js.
Contact Form with Google reCAPTCHA v2 (contact.html)
Step 1 - Get Site Key and Secret Key
Site Key and Secret Key is reqiured to have contact form with Google reCAPTCHA. To get these go to https://www.google.com/recaptcha/admin/create then complete all required fields. Once it done click Submit.
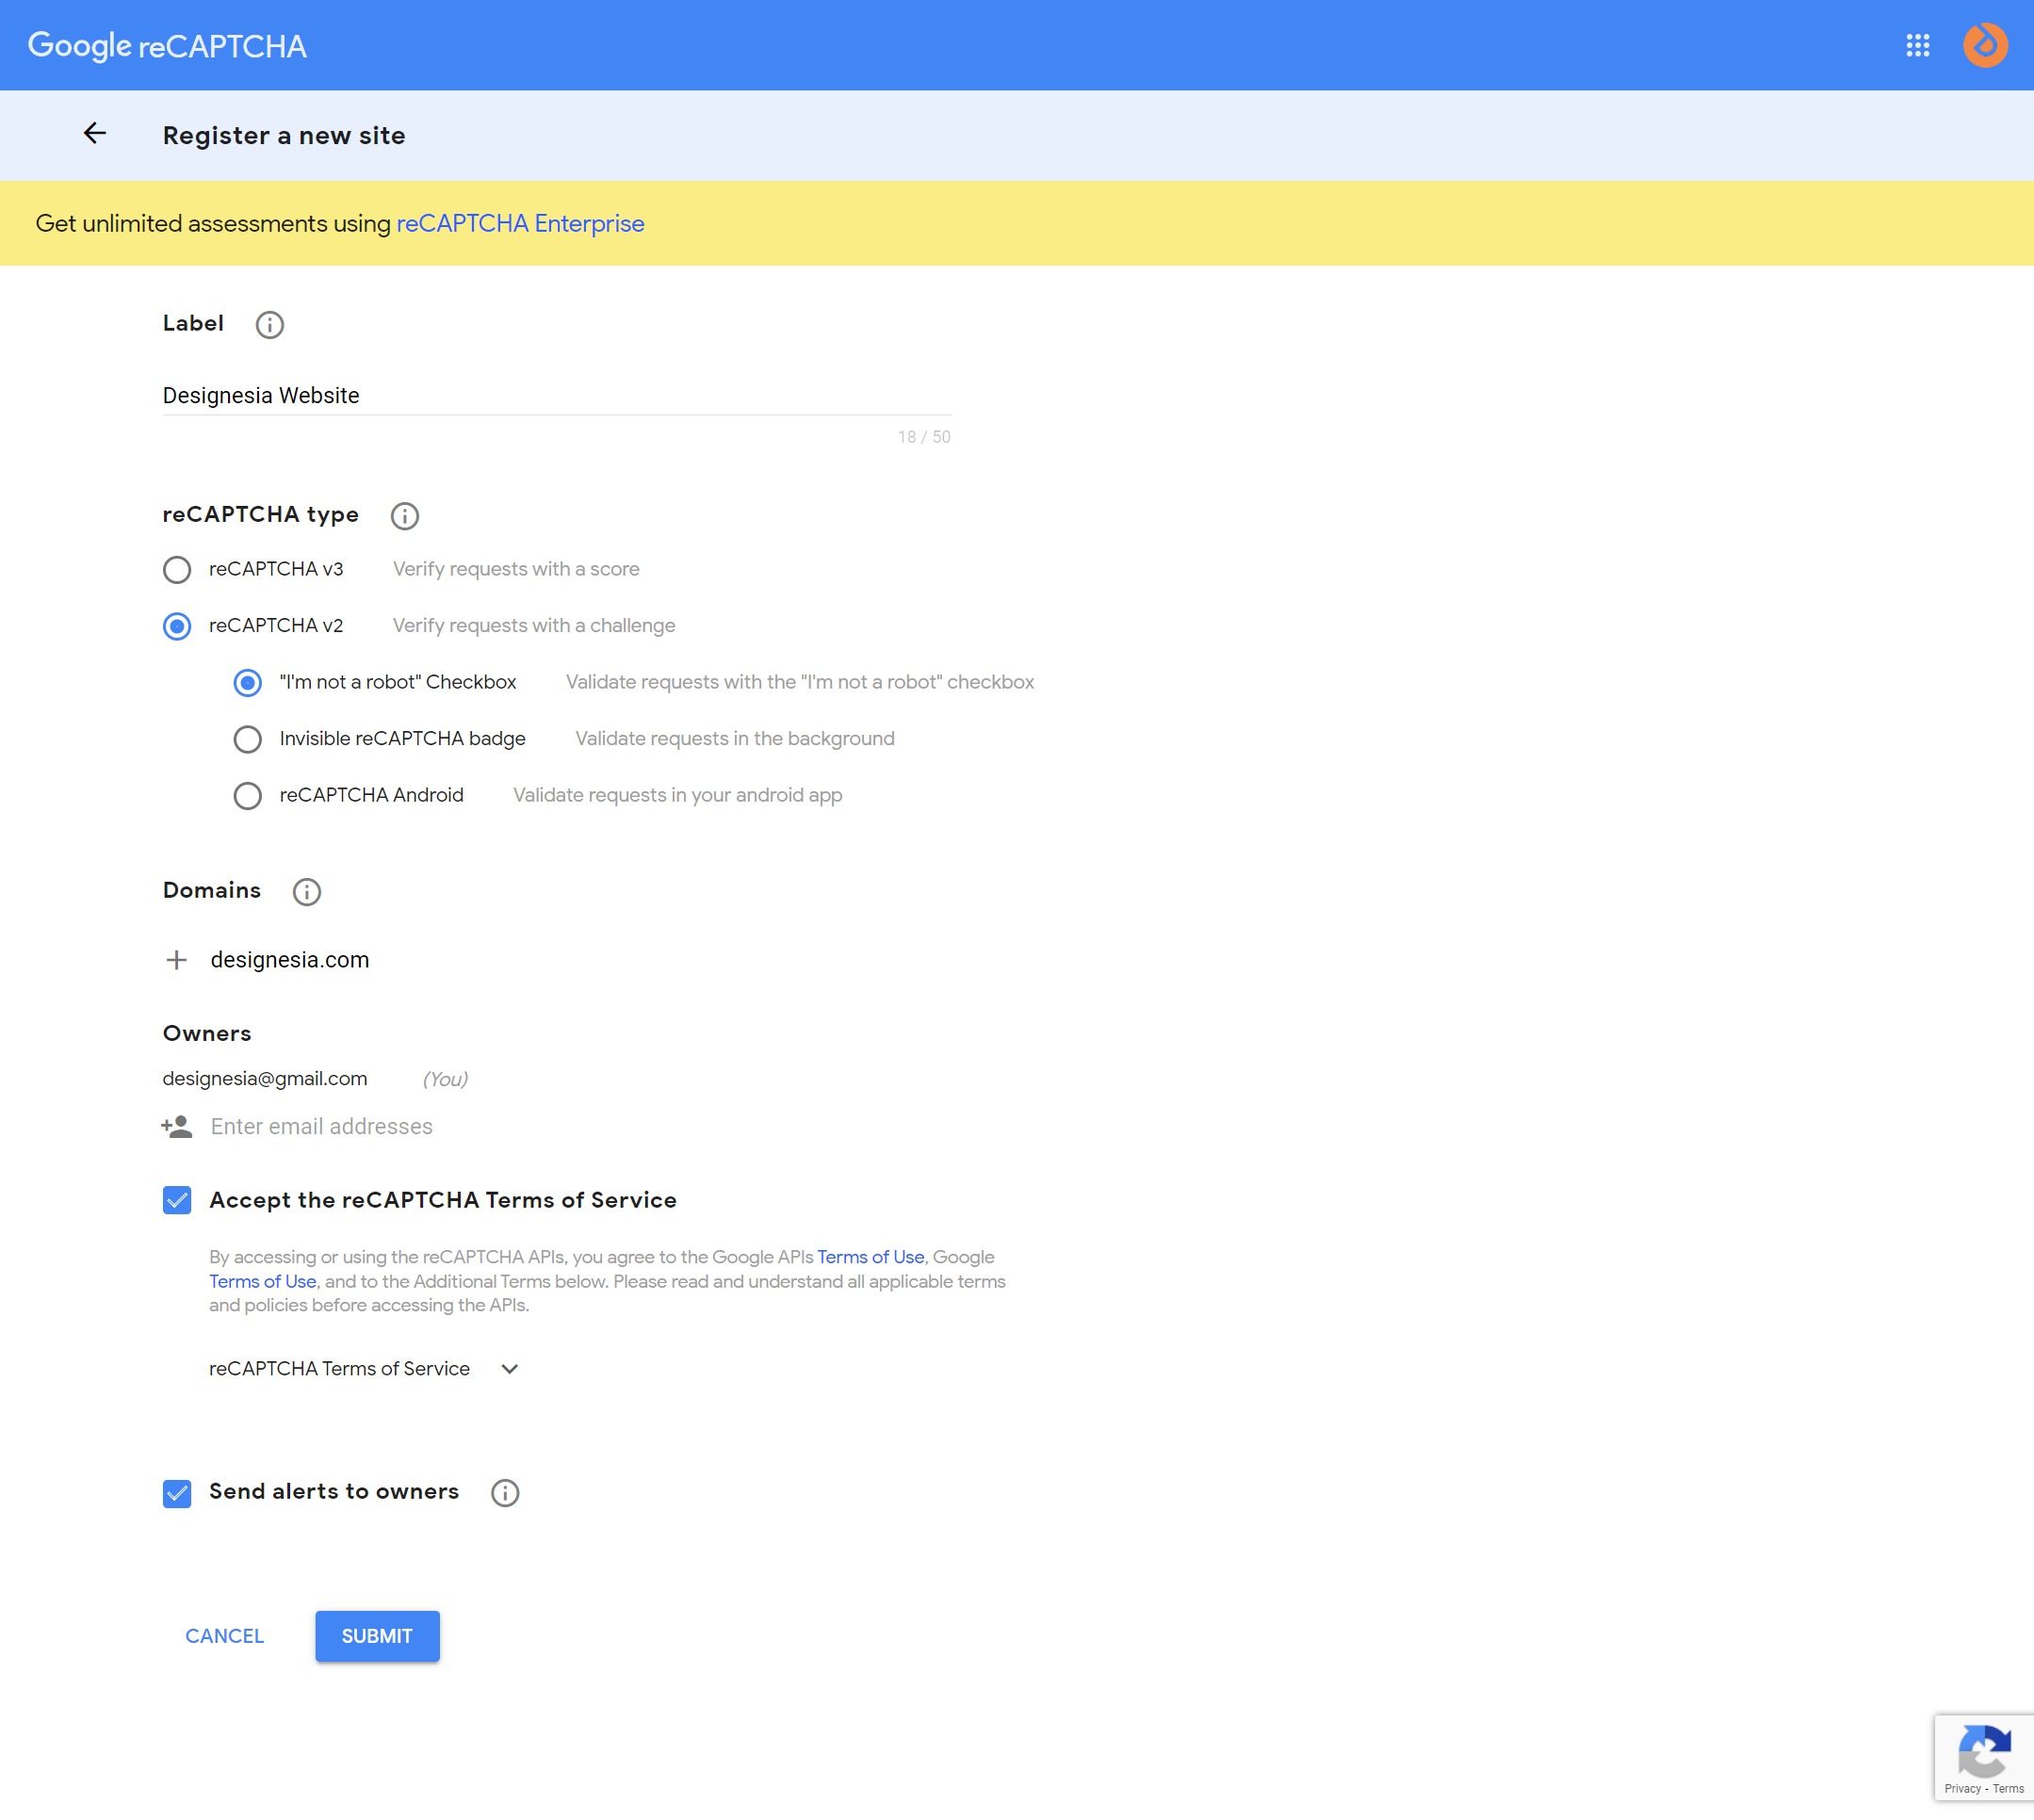
After click Submit we will get site key and secret key like below:

Step 2 - Insert Site Key and Secret Key
Now we need to insert Site Key and Secret Key to these files.
Insert Site Key into file contact.html
Open file contact.html then find code below. Replace data-sitekey value with the Site Key you've got.
<div class="g-recaptcha" data-sitekey="copy-your-site-key-here"></div>
Insert Secret Key into file handler.php
Open file handler.php then find code below. Replace initSecretKey value with the Site Key you've got.
$pp->getReCaptcha()->initSecretKey('copy-your-secret-key-here');
Step 3 - Change email address, subject and sender
Change email address
Open file handler.php then find code below. Replace sendEmailTo value.
$pp->sendEmailTo('your-email-here'); // ← Your email here
Change email subject / title
Open file /src/FormHandler.php then find code below. Replace text 'Contact Form Submission' with new text.
$this->mailer->Subject = "Contact Form Submission ";
Change email sender name
Open file /src/FormHandler.php then find code below. Replace text 'Contact Form' with new text.
$this->mailer->setFrom($from_email,'Contact Form',false);
jQuery and CSS Files
List of javascipt files
- jquery.min.js - http://docs.jquery.com/Downloading_jQuery
- bootstrap.min.js - bootstrap js file
- designesia.js - custom js file
- jquery.isotope.min.js - used in gallery page
- jquery.prettyPhoto.js - used to open popup image
- easing.js - http://archive.plugins.jquery.com/project/Easing
- jquery.ui.totop.js - used to scroll to top
- validation.js - used for contact form validation
List of CSS files
- animate.css - used to make animation
- bg.css - used to set background for all section and subheader
- bootstrap.css - main css framework for this theme
- color.css - used to load color for template
- magnific-popup.css - for maginfic popup jquery
- owl.carousel.css, owl.theme.css, owl.transitions.css - for owl carousel jquery
- plugin.css - overwrite default plugin css
- rev-settings.css - custom css for Revolution Slider
- style.css - main css file for this template